Cloud and Self-Hosting
Hyper-V Backup: How to Back Up Hyper-V Virtual Machines (Complete Guide)
By Amjid Ali · · Updated · 9 min read
In this article
- Hyper-V backup methods compared
- Method 1: Back up Hyper-V VMs with Windows Server Backup
- Method 2: Export-VM, the simplest Hyper-V backup on any host
- How to restore a Hyper-V VM from a backup
- Method 3: Checkpoints (before changes, not instead of backups)
- Method 4: Veeam Backup & Replication Community Edition
- Method 5: Back up Hyper-V VMs with AOMEI Cyber Backup
- Hyper-V backup best practices
- Conclusion
To back up Hyper-V, use Windows Server Backup on Windows Server (select the VMs under the Hyper-V node), or export each VM with the PowerShell command Export-VM -Name <VM> -Path <folder> on any Hyper-V host, including Windows 10 and 11. For scheduled, incremental backups with easy restores, use a backup product such as Veeam Backup & Replication Community Edition (free for up to 10 workloads) or AOMEI Cyber Backup. Checkpoints are useful before changes, but they are not backups.
Hyper-V is Microsoft's hypervisor, built into Windows Server and the Pro, Enterprise and Education editions of Windows 10 and 11. Each VM is a set of files: a configuration file (.vmcx), virtual disks (.vhdx), and checkpoint and saved-state files. A Hyper-V VM backup has to capture all of them in a consistent state, ideally while the VM keeps running. Hyper-V VM backup is essential for protecting your data and keeping the business running after a disk failure, ransomware or a bad update.
I run most of my homelab on Proxmox now, but the rule I follow there applies to Hyper-V too: keep at least one backup copy on different hardware from the host, and test a restore before you need one.
Hyper-V backup methods compared
| Method | Cost | Runs on | Good for | Limits |
|---|---|---|---|---|
| Windows Server Backup | Included with Windows Server | Windows Server hosts | Scheduled full and incremental VM backups to disk or share | Not on Windows 10/11; basic retention and reporting |
| Export-VM (PowerShell) | Free, built in | Any Hyper-V host | One-off copies, simple scheduled scripts, moving VMs | Full copy every time; no deduplication |
| Checkpoints | Free, built in | Any Hyper-V host | Quick rollback before updates | Not a backup: same storage as the VM |
| Veeam Backup & Replication Community Edition | Free up to 10 workloads | Windows server or VM | Incremental, application-aware backups, restores of single files | 10-workload cap; no technical support |
| AOMEI Cyber Backup | Free edition and paid plans | Windows | Agentless VM backup with a web console | Check edition limits |
| System Center DPM / Azure Backup Server (MABS) | Licensed | Windows Server | Larger Microsoft environments, Azure copies | More infrastructure to run |
Method 1: Back up Hyper-V VMs with Windows Server Backup
Windows Server Backup can back up individual Hyper-V virtual machines, including running ones, using the Hyper-V VSS writer.
-
Install the feature (once), in an elevated PowerShell window:
Install-WindowsFeature Windows-Server-Backup -IncludeManagementTools -
Open Windows Server Backup (
wbadmin.msc) and choose Backup Once for a one-off backup or Backup Schedule for a daily one. -
Select Custom, then Add Items, expand Hyper-V and tick the virtual machines you want. Leave Host Component ticked if you also want the host's Hyper-V configuration.
-
Choose the destination: a dedicated backup disk (best for schedules), a volume, or a remote shared folder.
-
Confirm and run. When it finishes, check the result in the console.
Back up Hyper-V VMs with PowerShell (Windows Server Backup cmdlets)
The same backup as a script, which you can run from Task Scheduler. It backs up every VM on the host to drive E:
$Policy = New-WBPolicy
Add-WBVirtualMachine -Policy $Policy -All
$Target = New-WBBackupTarget -VolumePath "E:"
Add-WBBackupTarget -Policy $Policy -Target $Target
Start-WBBackup -Policy $Policy
To back up only some VMs, run Get-WBVirtualMachine to list them and pass the ones you want to -VirtualMachine instead of using -All. To write to a network share instead, use New-WBBackupTarget -NetworkPath "\\nas\hyperv-backup" -Credential (Get-Credential). A network-share target keeps only the latest backup, so use a dedicated disk if you want several restore points.
Method 2: Export-VM, the simplest Hyper-V backup on any host
Export-VM copies a VM's configuration, virtual disks and checkpoints into a folder. It works on Windows Server and on Windows 10 and 11 with Hyper-V, and it can export a running VM.
One VM:
Export-VM -Name "SRV-APP01" -Path "E:\HyperV-Backups"
Every VM on the host, each into its own folder:
Get-VM | Export-VM -Path "E:\HyperV-Backups"
A data-consistent export of a running VM, using production checkpoint technology:
Export-VM -Name "SRV-APP01" -Path "E:\HyperV-Backups" -CaptureLiveState CaptureDataConsistentState
Schedule Hyper-V exports with a PowerShell script
Save this as C:\Scripts\Backup-HyperV.ps1. It exports every VM into a dated folder on a backup drive and deletes exports older than 7 days:
$Root   = "E:\HyperV-Backups"
$Today  = Join-Path $Root (Get-Date -Format "yyyy-MM-dd")
New-Item -ItemType Directory -Path $Today -Force | Out-Null

Get-VM | Export-VM -Path $Today -CaptureLiveState CaptureDataConsistentState

Get-ChildItem $Root -Directory |
  Where-Object { $_.CreationTime -lt (Get-Date).AddDays(-7) } |
  Remove-Item -Recurse -Force
Then create a daily task that runs it as SYSTEM (elevated PowerShell):
$Action  = New-ScheduledTaskAction -Execute "powershell.exe" -Argument "-NoProfile -ExecutionPolicy Bypass -File C:\Scripts\Backup-HyperV.ps1"
$Trigger = New-ScheduledTaskTrigger -Daily -At 2am
Register-ScheduledTask -TaskName "Hyper-V nightly export" -Action $Action -Trigger $Trigger -User "SYSTEM" -RunLevel Highest
Every export is a full copy, so make sure the backup drive has room for 7 copies of every VM. Copy the folder off the host (to a NAS or cloud storage) so a failure of the host does not take the backups with it.
How to restore a Hyper-V VM from a backup
From an Export-VM copy, point Import-VM at the .vmcx file in the export's Virtual Machines folder:
# Register the VM in place, using the exported files where they are
Import-VM -Path "E:\HyperV-Backups\2026-10-27\SRV-APP01\Virtual Machines\<GUID>.vmcx"

# Or copy it to the host's default locations with a new ID (keeps the original VM)
Import-VM -Path "E:\HyperV-Backups\2026-10-27\SRV-APP01\Virtual Machines\<GUID>.vmcx" -Copy -GenerateNewId
In Hyper-V Manager the same thing is Action > Import Virtual Machine.
From Windows Server Backup, open Recover, pick the backup date, choose Hyper-V as the recovery type, select the VMs and restore them to the original location or to another location.
Method 3: Checkpoints (before changes, not instead of backups)
Production checkpoints use VSS inside Windows guests (or a file system freeze in Linux guests) to capture a data-consistent state; standard checkpoints also capture memory. Microsoft notes that a standard checkpoint is not a full backup. Checkpoints live as .avhdx files next to the VM's disks, so a failed disk loses both.
# Take a checkpoint before an update
Checkpoint-VM -Name "SRV-APP01" -SnapshotName "Before-KB-update"

# List and roll back if needed
Get-VMCheckpoint -VMName "SRV-APP01"
Restore-VMCheckpoint -Name "Before-KB-update" -VMName "SRV-APP01" -Confirm:$false

# Delete it when you are happy (Hyper-V merges the .avhdx back into the .vhdx)
Remove-VMCheckpoint -VMName "SRV-APP01" -Name "Before-KB-update"
Never delete .avhdx files by hand; remove checkpoints from Hyper-V Manager or PowerShell so they merge correctly. If you need a checkpoint as an off-host copy, Export-VMCheckpoint turns it into an exportable VM.
Method 4: Veeam Backup & Replication Community Edition
Veeam's free Community Edition protects up to 10 workloads, including Hyper-V VMs, Proxmox VE, VMware and physical Windows and Linux machines. It adds what the built-in tools lack: incremental forever backups, retention policies, application-aware processing, and restores of single files or whole VMs. It does not include technical support; for more than 10 workloads Veeam points you to its paid editions. Download it only from veeam.com.
Method 5: Back up Hyper-V VMs with AOMEI Cyber Backup
AOMEI Cyber Backup is an enterprise data backup solution that helps safeguard all data in VMware, Hyper-V, and SQL Servers. It provides flexible scheduling options, allowing users to automate backup tasks based on specific time intervals or events. Automated backups ensure regular protection of Hyper-V VMs, reducing the risk of human errors and enhancing operational efficiency.
✦Ease of Use: AOMEI Cyber Backup provides a user-friendly interface that simplifies the backup process, making it accessible to both beginners and IT professionals to easily configure and schedule backups.
✦Comprehensive Backup Options: AOMEI Cyber Backup supports agent-based backups, agentless backup, image-level backups, offering flexibility to match different requirements. Users can choose the backup method that best suits their virtualized environment and recovery objectives.
✦Incremental Backups: AOMEI Cyber Backup optimizes storage space by performing incremental backups. This means that after the initial full backup, subsequent backups only capture changes made since the last backup. This ensures efficient use of resources and reduces the backup time and storage requirements.
✦Centralized Management: The software allows for centralized management of backup tasks, enabling efficient monitoring, scheduling, and managing multiple VM backups. Administrators can have a comprehensive overview of the backup status and easily manage backups for their VMware Datastore environment.
✦Cost-Effective: AOMEI Cyber Backup offers competitive pricing options, making it an affordable solution for businesses of all sizes. It offers a lifetime free version and can customize an exclusive backup solution for your business as well.
AOMEI Cyber Backup supports Hyper-V in Windows 8/8.1/10/11, Windows Server/Microsoft Hyper-V Server 2012 R2 and later versions. Next, please go through the backup process of Hyper-V VM.
Protect Hyper-V data with AOMEI Cyber Backup (steps)
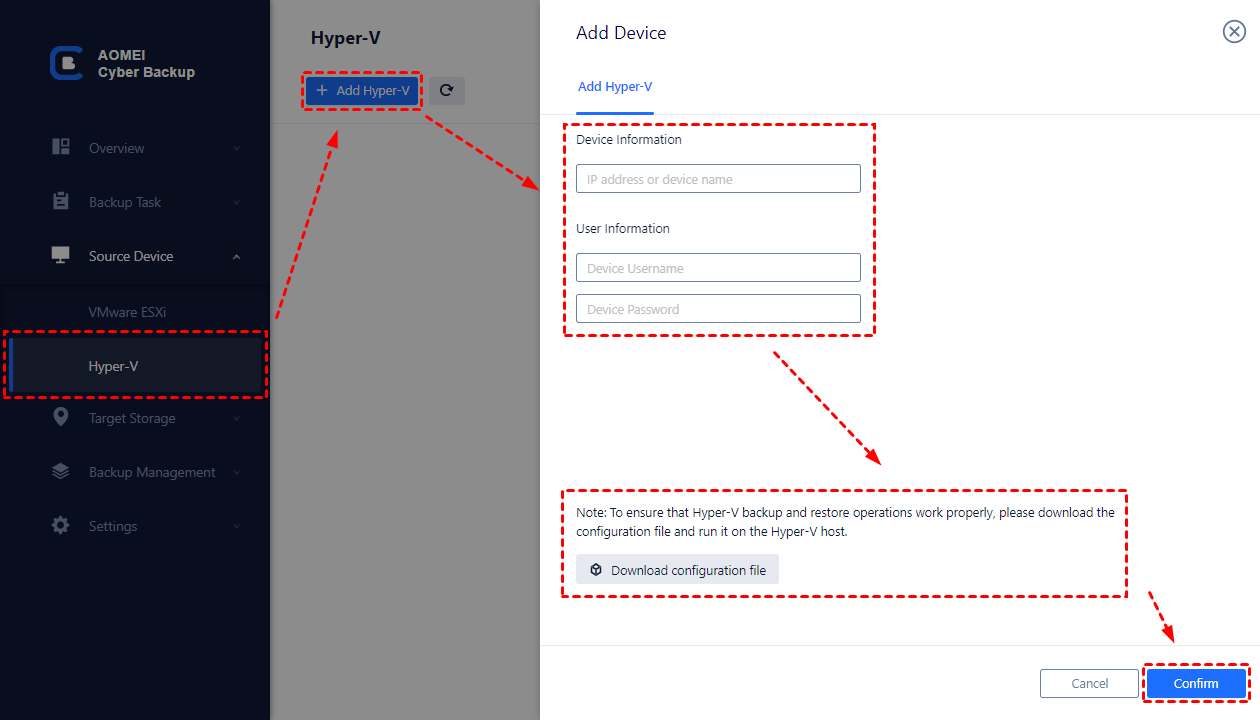
1. Bind Devices: Access AOMEI Cyber Backup web client and navigate to Source Device > Hyper-V > + Add Hyper-V to add a Hyper-V host. Click … next to the host name and select Bind Device.
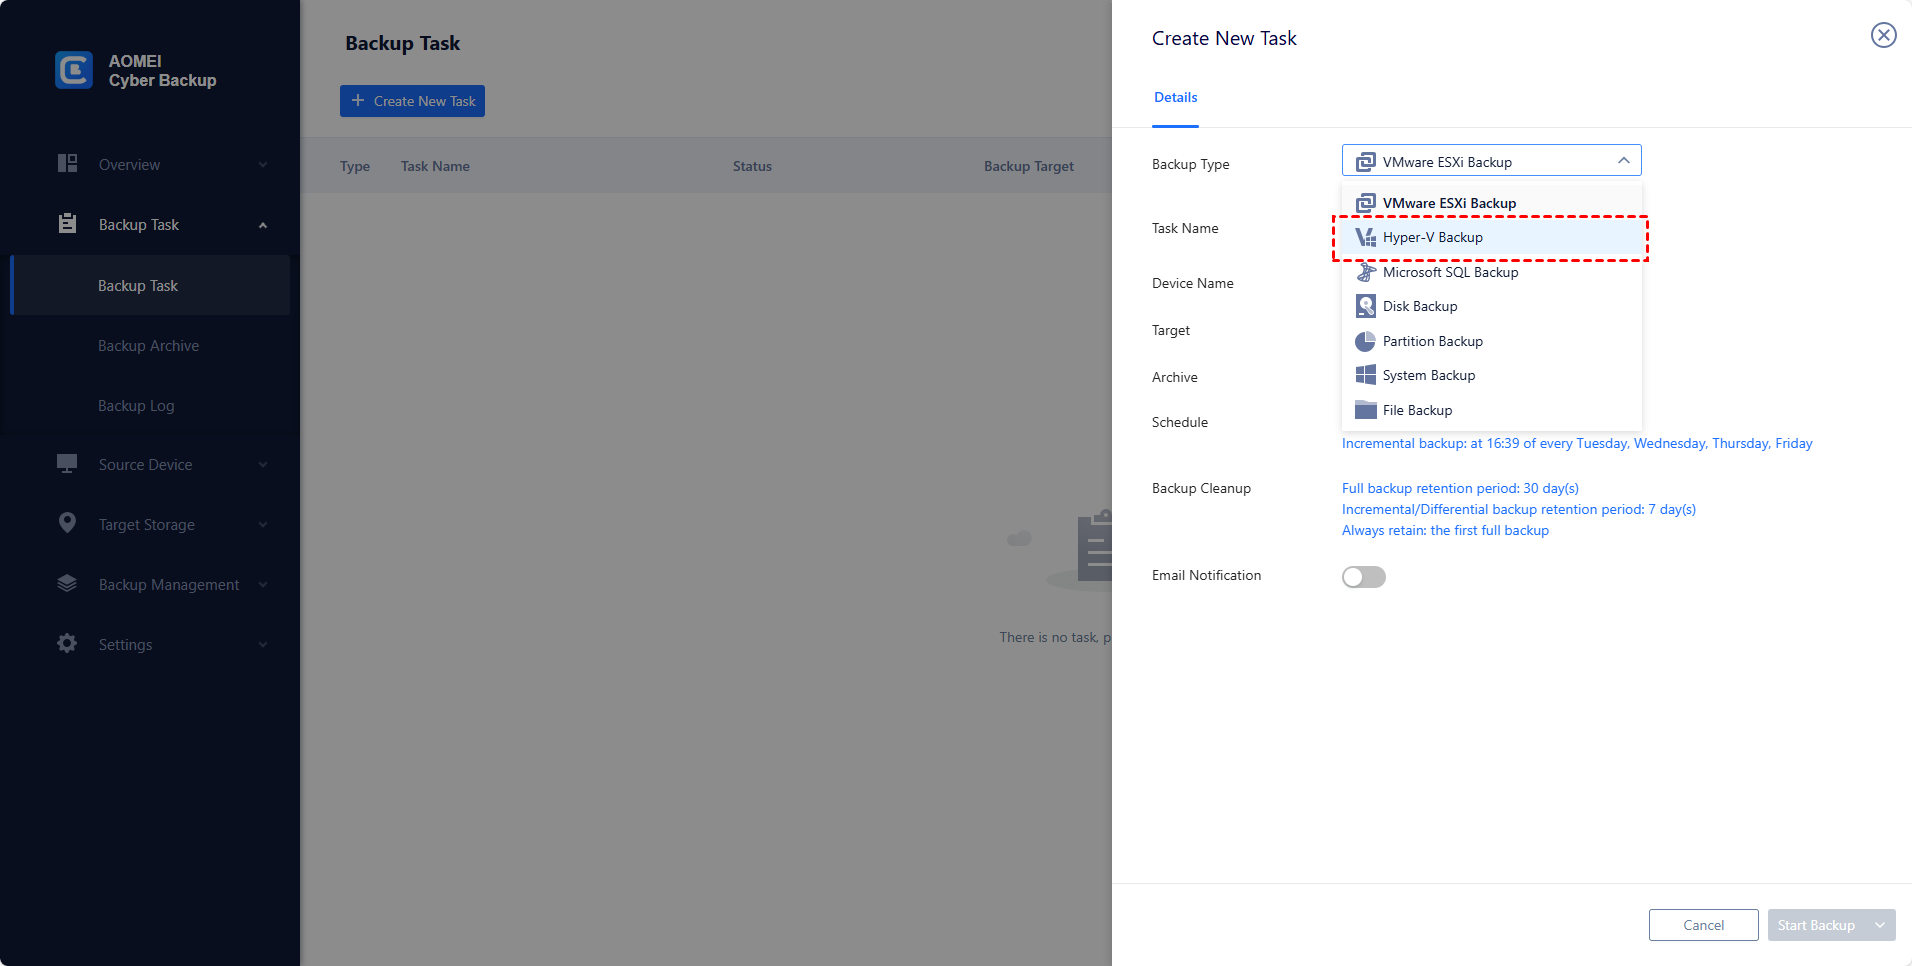
2. Create Backup Tasks: Navigate to Backup Task and click + Create New Task. Specify the Task Name, Backup Type, Device, Target, and Schedule as needed.
-
Device: Specify multiple virtual machines you want to backup.
-
Target: You can select to back up to a local path, or to a network path.
-
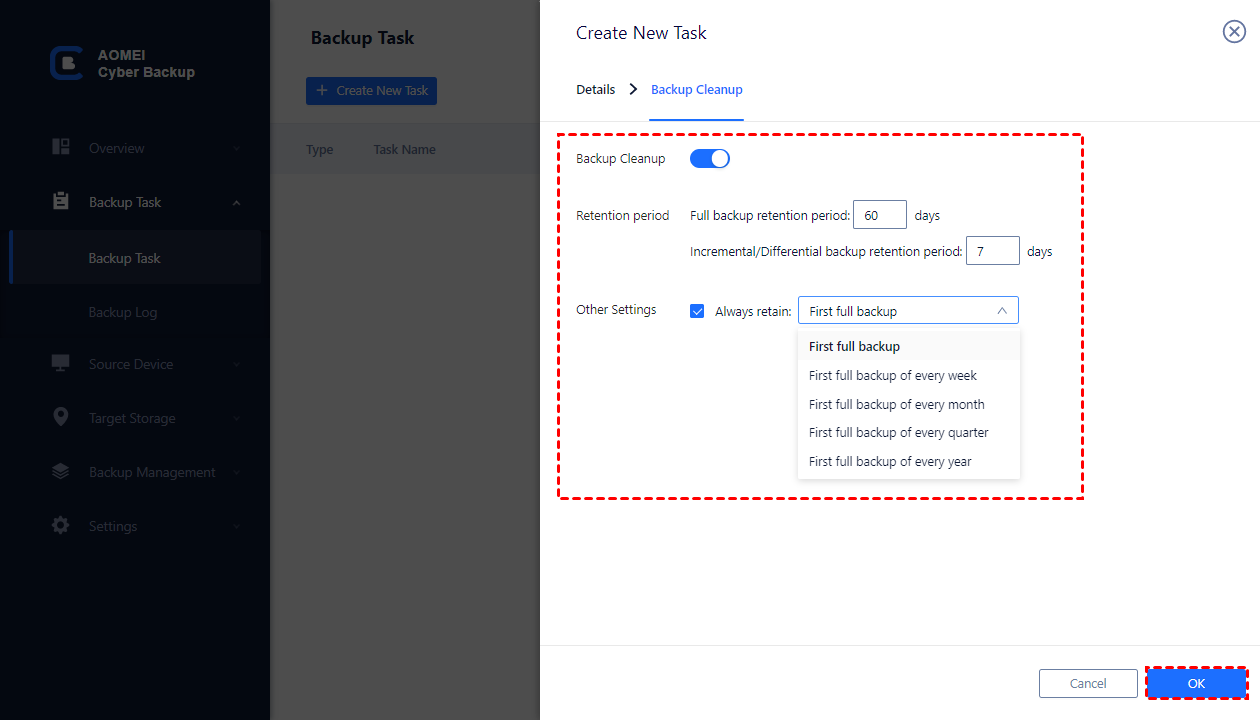
Schedule: Choose to perform full or incremental backup, and automate execution daily, weekly or monthly according to the frequency you specified.
-
Backup cleanup: Configure a retention policy to auto delete old backup files and save storage space.
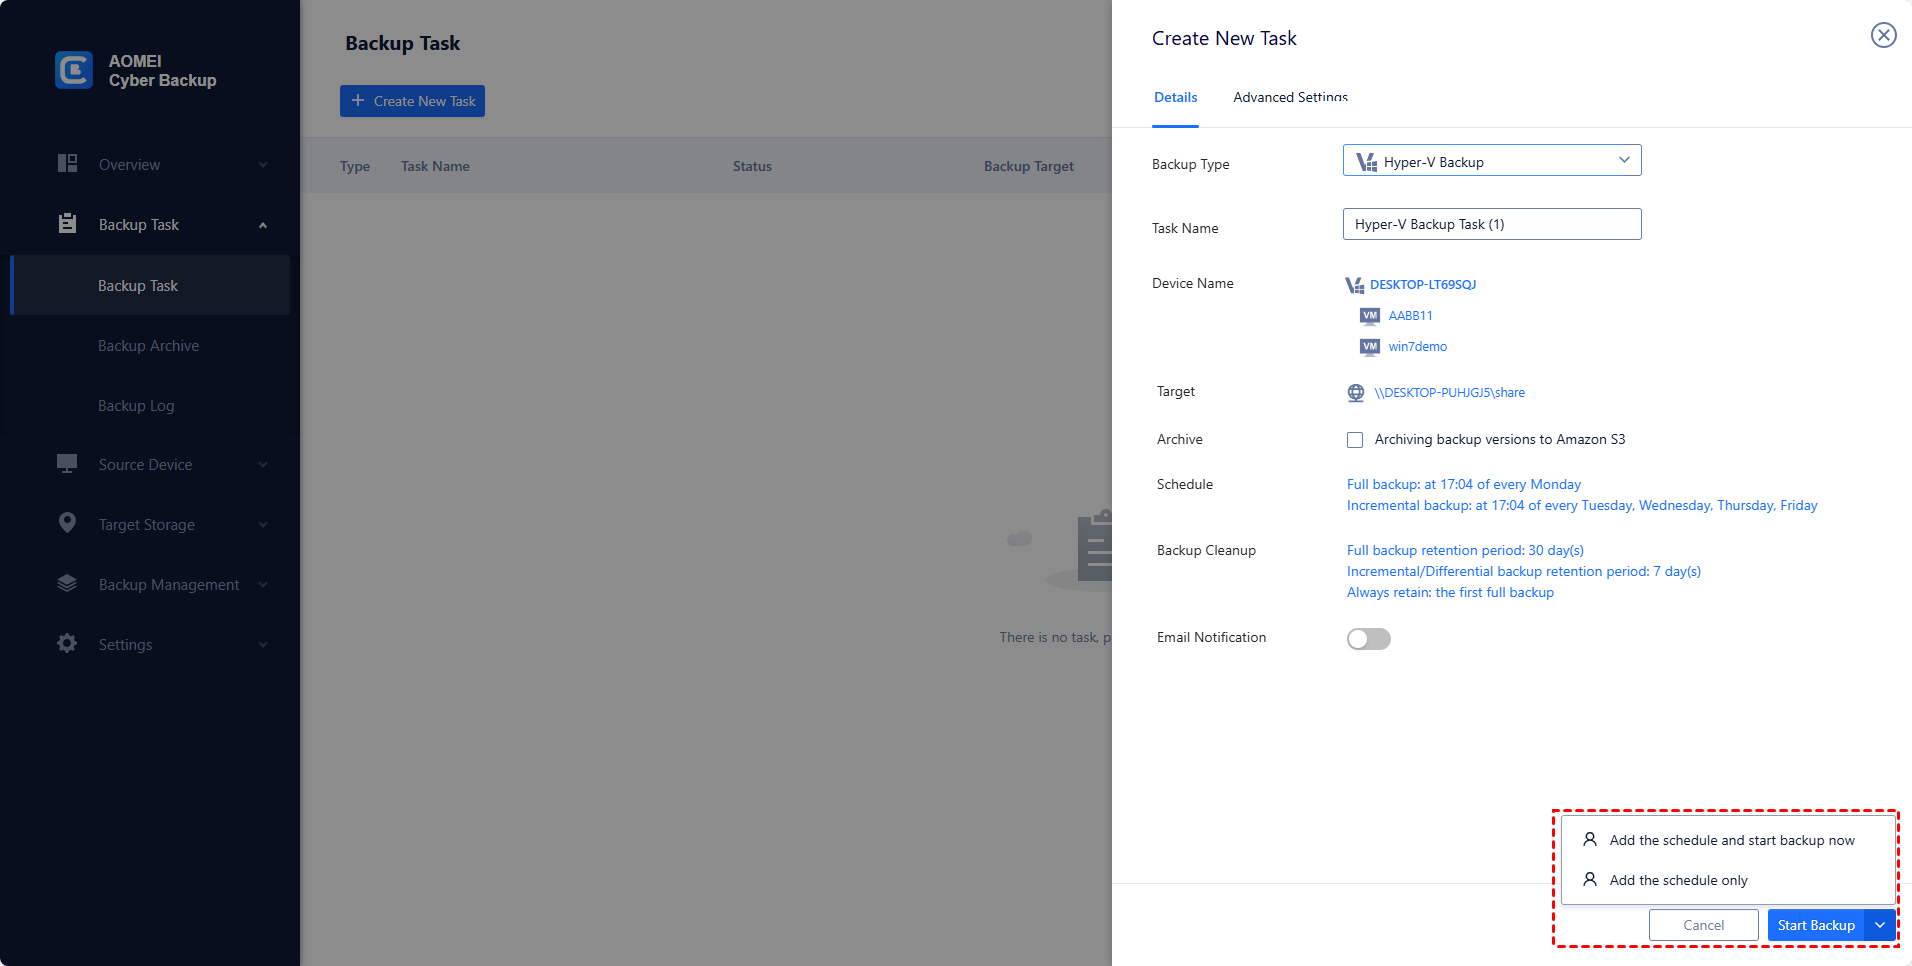
3. Click Start Backup you can select to Add the schedule only, or Add the schedule and start backup now.
4. When you want to restore VMs: Navigate to Backup Management > History Versions and select the VM you want to restore, all restore points related to the VM will be listed on the left.
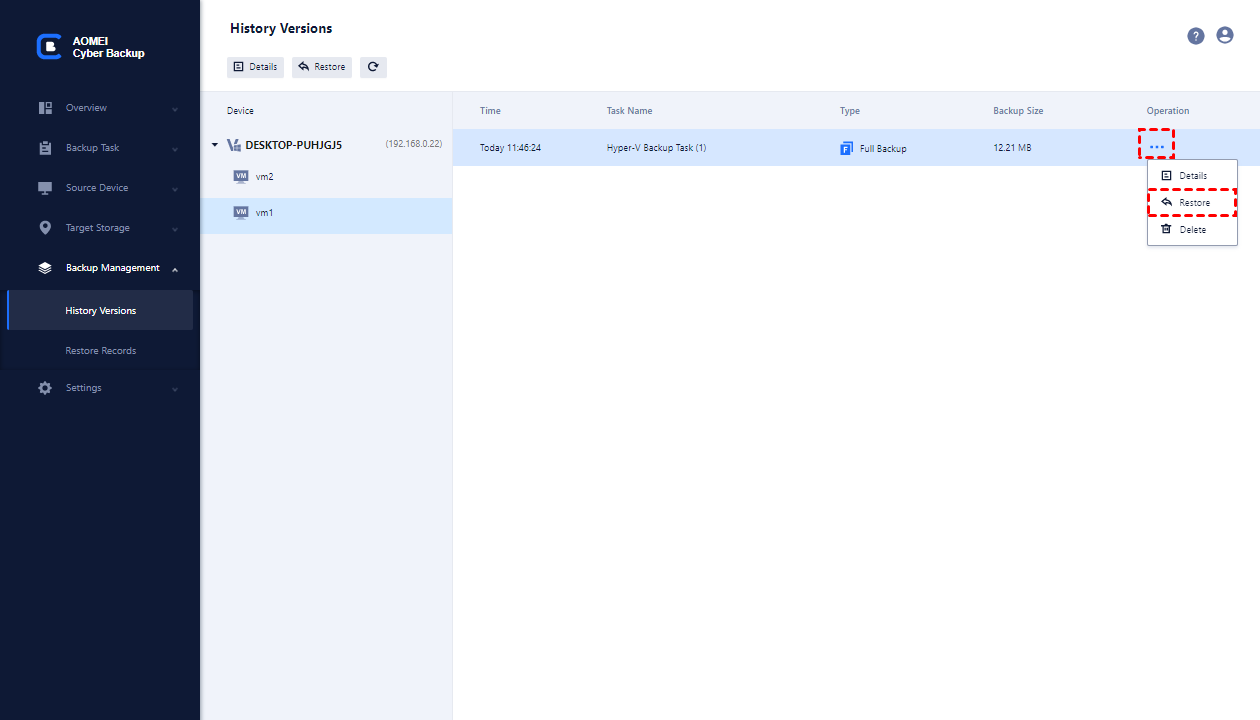
Select one and click … > Restore to open the restore wizard.
▶ Restore to original location: Recover the Hyper-V VM to its previous position fast.
▶ Restore to new location: Create a new VM in another datastore/host directly from the backup, saves the trouble of re-configuring the new VM.
Hyper-V backup best practices
- Follow 3-2-1: three copies of your data, on two different types of storage, with one copy off-site.
- Back up to separate hardware. A backup on the same disk or host as the VM protects you from almost nothing.
- Test restores every few months by importing a backup as a copy with a new ID on an isolated network.
- Do not leave checkpoints running for weeks. Long checkpoint chains slow the VM and grow the .avhdx files.
- Back up the host configuration too (Windows Server Backup's Host Component or your own notes of virtual switches and settings).
- Keep application backups for databases such as SQL Server in addition to VM backups, so you can restore a single database.
Conclusion
A reliable Hyper-V backup protects you from disk failures, ransomware and bad updates. Windows Server Backup and Export-VM cover small environments at no extra cost; Veeam Community Edition adds incremental backups and granular restores for up to 10 workloads; and AOMEI Cyber Backup offers a web-console approach with incremental backups, retention and quick restores. Whatever you choose, keep a copy away from the host and test that it restores.
If you are rethinking the hypervisor itself, see our comparison of the best VMware alternatives in 2026, how Proxmox Backup Server handles VM backups, and the Proxmox VE guide. To learn Proxmox properly, Amjid's course Proxmox Virtualization Environment: Complete Training covers VMs, storage and backups step by step.
Frequently asked questions
How do I back up a Hyper-V virtual machine?+
On Windows Server, install the Windows Server Backup feature, open wbadmin.msc, choose Backup Once or Backup Schedule, select Custom, add the virtual machines under the Hyper-V node, and pick a backup disk or network share. On any Hyper-V host, including Windows 10 and 11, you can also run Export-VM -Name <VM> -Path <folder> in PowerShell, which copies the VM's configuration, disks and checkpoints to a folder you can import later.
Can you back up a running Hyper-V VM?+
Yes. Windows Server Backup and backup products such as Veeam use the Hyper-V VSS writer and production checkpoints to take application-consistent backups of running VMs. Export-VM can also export a running VM; its -CaptureLiveState parameter lets you choose a data-consistent production checkpoint (CaptureDataConsistentState), saved memory state (CaptureSavedState) or a crash-consistent copy.
Are Hyper-V checkpoints a backup?+
No. Microsoft's documentation says a standard checkpoint is not a full backup. Checkpoints are stored as .avhdx files next to the VM's virtual disks on the same storage, so if that disk fails you lose both. Use checkpoints before updates or changes, then delete them, and keep real backups on separate storage. You can export a checkpoint as a VM, and an exported checkpoint can be used as a backup.
Is there free Hyper-V backup software?+
Yes. Windows Server Backup is included with Windows Server at no extra cost, Export-VM is built into the Hyper-V PowerShell module, and Veeam Backup & Replication Community Edition is free for up to 10 workloads, including Hyper-V VMs, without technical support. AOMEI Cyber Backup also has a free edition.
How do I restore a Hyper-V VM from a backup?+
From an Export-VM copy, run Import-VM with the path to the .vmcx file in the export's Virtual Machines folder; add -Copy -GenerateNewId to import a copy with a new ID alongside the original. From Windows Server Backup, open the Recovery Wizard, choose the backup date, select Hyper-V as the recovery type, and restore to the original or an alternate location.
Where are Hyper-V VM files stored?+
On current Windows and Windows Server versions, by default the VM configuration is under C:\ProgramData\Microsoft\Windows\Hyper-V and the virtual disks under C:\ProgramData\Microsoft\Windows\Virtual Hard Disks, unless you changed the defaults in Hyper-V Settings. Run Get-VM | Select-Object Name, Path and Get-VMHardDiskDrive -VMName <VM> to see where each VM actually lives before you back it up.
Sources
- Export-VM, Microsoft Learn
- Import-VM, Microsoft Learn
- Using checkpoints, Microsoft Learn
- Add-WBVirtualMachine, Microsoft Learn
- New-WBBackupTarget, Microsoft Learn
- wbadmin start backup, Microsoft Learn
- Veeam Backup & Replication Community Edition, Veeam
- Back up Hyper-V virtual machines with MABS, Microsoft Learn
Related videos
Video library- Cloud and Self-Hosting
Ubuntu Server Installation on Hyper-V | Step-by-Step Guide
· 4:45 · 19.1K views
Watch on YouTube - Cloud and Self-Hosting
Proxmox Networking: How to Configure VLANs for Nodes and Virtual Machines
· 11:48 · 11.2K views
Watch on YouTube
Keep reading
 Cloud and Self-HostingProxmox: You need ifupdown2 to reload network configuration (500): How to Fix ItFix Proxmox "you need ifupdown2 to reload network configuration (500)": fix the repos, install ifupdown2 safely, then Apply Configuration. PVE 6 to 9. · 5 min read
 Cloud and Self-HostingBest VMware Alternatives in 2026: Proxmox, Hyper-V, XCP-ng & MoreBroadcom killed free ESXi. Here are the 7 best VMware alternatives in 2026 — compared on features, pricing, migration path, and who each is best for. · 14 min read
 Cloud and Self-HostingInstalling Kubernetes Dashboard on a K3s High Availability Cluster (Ubuntu 24.04)The Kubernetes Dashboard is a browser-based UI that allows you to visualize, manage, and troubleshoot workloads and resources inside your Kubernetes clu... · 2 min read